Remodeling grow-out cages.

Rabbit Talk  Forum

Help Support Rabbit Talk Forum:

This site may earn a commission from merchant affiliate links, including eBay, Amazon, and others.

grumpy

Well-known member
Joined
Jan 25, 2012
Messages
2,004
Reaction score
19
Location
plattsburg, missouri
"Well, it's not what I wanted, but I suppose I can live with it."
Was the first thing that went through my mind when I added 20 holes for fryers in the grow-out room. I COULD NOT believe I'd made that big of a mistake when I somehow "miss-measured" the layout. The aisle was workable, but far too narrow for comfort.

SANY0044.jpg


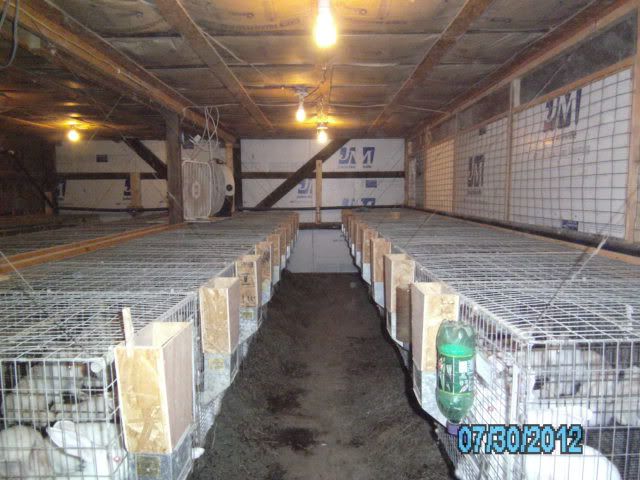
18 months was all I could stand working in this narrow aisle. Bi-weekly pickups of 40-50 fryers was too hard on this short, old, fat man bending over, squatting down, and gathering up young rabbits that didn't want to be "gathered-up". Consequently, I started making some changes in cage design and construction.

Newcages008_zps28a5b43e.jpg


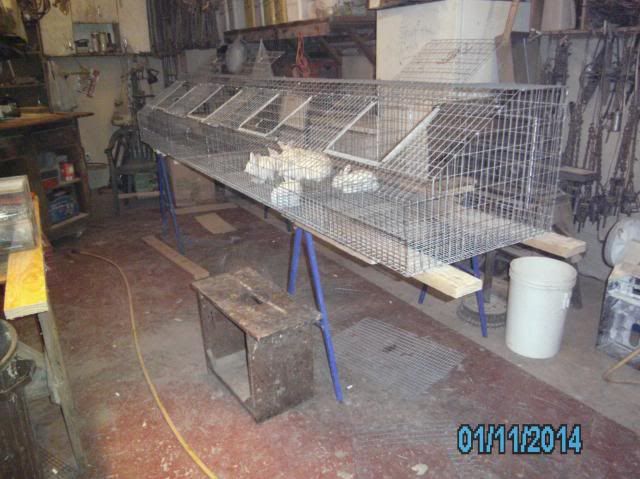
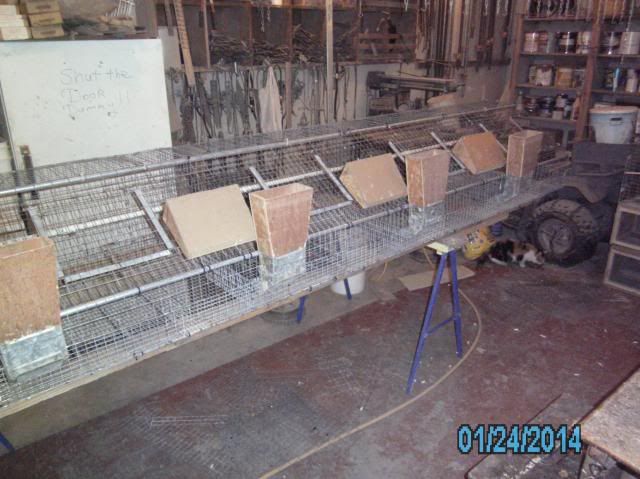
30" deep, front-loading cages just wasn't my idea of a "fun-time". I'd seen the "sloped-front" style of cages, but realized the work involved making them is about "twice" that of a regular cage. There were 10 holes per side, 24" wide and the too-long 30" deep. I had a very short window of time to get this done because of all the youngsters needing to be moved. I got two 10' sections ready to install. I would lose two (2) holes per side, but gain so many more advantages with the wider aisle and easier cages.

Then, I removed one entire row of cages.
NewGrowoutCages003-Copy_zps090969f3.jpg


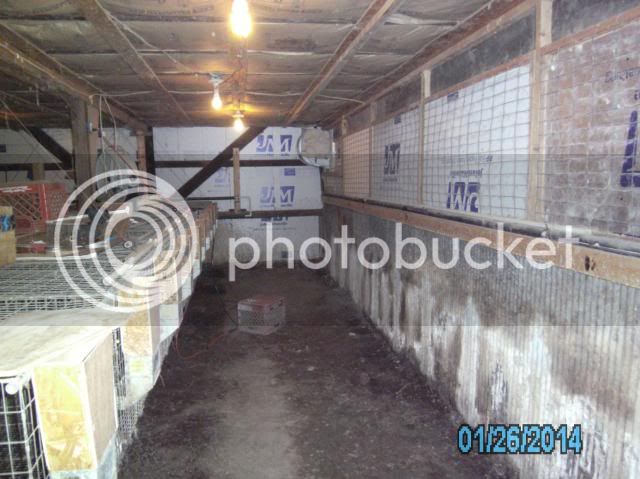
And re-installed 8 holes 30" wide and only 24" deep with the sloped-front style. I can tell already that it is going to be so much easier working this aisle of cages with the changes I made. It was a beautiful day yesterday with temps near 60 degrees. I had two of the boys at home and they got the manure cleaned out so I could work fairly fast.

NewGrowoutCages005_zpscdb14f83.jpg


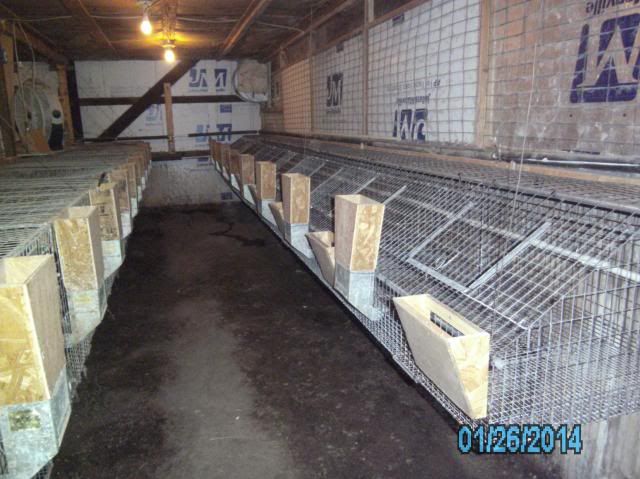
I've still got the left-hand side to do and I'll start on the cage rebuilding sometime today. But overall I'm much more content already with the wider aisle and different style cages. By tonight, these new cages will have 40-50 fryers ready for finish in them. The change came none too soon.

Grumpy
 
That looks REALLY good :)
Thank you for sharing the pics. I bet it will be a lot easier on your back too.
 
I have a question Grumpy, I believe you can help me.
How high is the front where you place the bend to create the slant?
Do you just cut down the side wire and re-attache the front/door section?
I am very interested in doing the same with the cages I now have.
I plan on trying it with an unoccupied cage and slowly replacing
each as I go. Thanks so much for sharing! You have placed a fire under my,
I guess I just can't say. :D
Ottersatin :eek:ldtimer:
 
On the side of the cage where the slant is cut, I see some of the corners are square. I'm cool with that - no sharp edges. But some of the wires look like they just go up and stop.

Did you bend over the wires to hold the slant top on? Are they welded? Do they just go up and stop where the slant is? Just curious on how you cut the side of the cage wire to make the slant.

I haven't been able to tell in the pictures.
 
TwoAcreDream":1nivif8n said:
I found this thread of his where he details his cage making.
( hope you don t mind Grumpy :) )
used-cages-repurposed-t19587.html

luvabunny":1nivif8n said:
On the side of the cage where the slant is cut, I see some of the corners are square. I'm cool with that - no sharp edges. But some of the wires look like they just go up and stop.

Did you bend over the wires to hold the slant top on? Are they welded? Do they just go up and stop where the slant is? Just curious on how you cut the side of the cage wire to make the slant.

I haven't been able to tell in the pictures.


ottersatin":1nivif8n said:
I have a question Grumpy, I believe you can help me.
How high is the front where you place the bend to create the slant?
Do you just cut down the side wire and re-attache the front/door section?
I am very interested in doing the same with the cages I now have.
I plan on trying it with an unoccupied cage and slowly replacing
each as I go. Thanks so much for sharing! You have placed a fire under my,
I guess I just can't say. :D
Ottersatin :eek:ldtimer:

Ottersatin:
I'm getting ready to tear another cage apart to re-build it like the one in the pictures. I'll take some pics of each process and try to give a better detail of the work I do. I've seen cages with the front and top "bent" to make the angled face. I've never liked the appearance of this finished product. I've seen where they've bent the side panels rather than cutting them off at the right angle. Again, that's just too sloppy for my taste.

Luvabunny:
I use a high-speed air grinder with a sixteenth-inch thick, 3 inch round cutoff wheel for the side panels. Every third upright wire meets with a horizontal wire (welded-joint). The two in between are cutoff to a height that meets the angled face. There are some burrs on these that are easily removed with a small 8" mill file. The burrs aren't nearly as rigid as the cut is when using wire cutters.

TwoAcreDream:
Naw, that's fine. I suppose I oughta take more pics as I go along. I just figured folks would get bored if I did. Nor....do I like tooting my own horn! I just want to help with what I can where I can.

:p I'm a super-duper scrounger!! :p

Ya'll gotta remember I'm usin' stuff that "ain't-new" and keep in mind that the rabbits that are goin' to be in these cages, won't be in them very long.
Two or three weeks is as long as the fryers stay with me.

So, don't be alarmed if I have a patch or seam in the flooring.

I will "fess-up" to one thing though, I've got two cages in my production room that have seamed floors and the does are doin' just fine with no foot problems.

Here's a pic with the cages on sawhorses in the shop. I tried various positions for the hay rack before settling on the front of the cage. You can see the corral-panel floor spreaders I used on the bottoms. If'n ya look close enough.
NewGrowoutCages002_zpsd69469b4.jpg


Grumpy.
 
Please forgive me because I'm a hands on type and don't visualize well. I'm not trying to be annoying, I just have a hard time picturing things.

So, on the side, every 3rd square is a welded square, and the wires in between just go up the right height and stop? They aren't attached to anything? Or welded? Or folded over?

How are you attaching the top to the sides? Hog rings? And only on the welded squares?

I love the design. It looks much easier to work with. I just haven't figured out yet how to duplicate it.
 
luvabunny":29d0ecna said:
Please forgive me because I'm a hands on type and don't visualize well. I'm not trying to be annoying, I just have a hard time picturing things.

So, on the side, every 3rd square is a welded square, and the wires in between just go up the right height and stop? They aren't attached to anything? Or welded? Or folded over?
No, they're not welded nor bent over. Every third bar is ringed to the angled face with small crab-pot rings. You can get these at Klubertanz. They're used to put cages together also. If you'll look at the first pic, you can see the rings that attach the side panel to the angled-face panel.

How are you attaching the top to the sides? Hog rings? And only on the welded squares?
See above for the answer.

I love the design. It looks much easier to work with. I just haven't figured out yet how to duplicate it.

I'll take more time with the pics this next time. Got called away this afternoon, my boy's truck wouldn't start. So, I fiddle-farted around with it until my mechanic showed up.

He crawled under the darned thing with a small screwdriver.
""Tink-a-tink..boink-a-boink..""

"OKAY....give it a try."

The darned thing fired right up....bad solenoid. He'll fix it tomorrow.

Grumpy
 
Back
Top