Anyone have advise on building nest boxes

Rabbit Talk  Forum

Help Support Rabbit Talk Forum:

This site may earn a commission from merchant affiliate links, including eBay, Amazon, and others.

3girls&1man

Active member
Joined
Feb 21, 2014
Messages
39
Reaction score
0
Location
Jacksonville, FL
I need all the help I can get on building nest boxes. I have holland Lops and NZ. I currently use plastic litter pans but let me tell you they do not work. They are so lite that they flip them over and when the doe jumps out there it goes on the side. I even tried zip tying it to the cage and it just dont work out. SO any advise on building the nest boxes would help or any ideas for nest box in general. I do have an outdoor rabbitry. Thanks in advance
 
Well,

For sure, you're gonna need two different sizes. If you can find a construction
site, where they've started to finish the rough-in phase, you ought to be
able to pick-up the OSB scraps free of charge. As long as the piece has one
factory edge, you can square off of that to keep the pieces uniform.

I don't know what your expertise is with operating power equipment so be
careful and count all of your fingers "before" and "after" you've finished. :D

good luck.

grumpy.
 
I hear you on the flipping over/too light!
I build my nestboxes out of untreated wood [Satins].
The boxes are built two inches longer and two inches wider
than the Rabbit they will be used for.
A nestbox which is too larg may end up being used as a potty,
that is the reason to make sure to not place any nestbox in the rabbits potty corner.
I drill a few holes for drainage through the floor in the back end of the nestbox.
I find this system has worked very well for me and my herd.
I am certain others will come up with a few more options.
Ottersatin. :eek:ldtimer:
 
Mine are mostly 1/2 inch ply wood held togeather with screws as they need to be sturdier since they hang over the door - link to picture gallery/image.php?album_id=191&image_id=1473&view=no_count

I think most people get away with using 1/4 inch.

Make sure you can fit the nest box through the door so 10" x 10" is usually the maximum height and width and 23" for the length
 
Thanks for all the replies I really like the nest on the outside of the cage like that. It is kinda like my bird nest boxes. Grumpy Im pretty good with power tools. My husband use to leave some of his lying around but when I started taking down walls he locked them up I had to buy my own with the promise I will ask before I cut nail saw or screw. And hubby went on to preach about something how I make him nervous out there with all that power and the kids aggravating me :lol: :lol: :lol:
 
One of the best investments I ever made, took nearly my entire life to even
consider. I was raised and schooled in the wood-crafting world by old-time
artisans. "Power-tools" were "horrid" pieces of machinery unworthy of
praise. I laugh now over their obstinate attitude concerning any form of
change. :lol: :lol:

For decades, I refused to use, or have on my property, any type of pneumatic
air nailer. Hand-hammered nails was the ONLY way I built anything.
I could have never been more incorrect.!!!! I was faced with a complete
remodel on this old farm-house I bought. All the way down to replacing
every piece of trim. I broke down and bought a "finish" air nailer. WOW!!!

An old dog can learn new tricks!! I was flabbergasted!! LOL

I added ONE more air-fastener: A 1/4"-Crown Air-Stapler that can shoot
small 1/4" staples from a half-inch long all the way to an Inch and a half.
Without question, it's quicker, safer, and much more stable than trying
to use conventional nails. All you need to do is use a little glue along with it.

I use old "re-purposed" 1/4" peg-board for the nest box bottoms.

With the air-nailers one can use smaller thicknesses of sheeting.
Just add glue.

Grumpy.
 
grumpy":20kiwl8i said:
One of the best investments I ever made, took nearly my entire life to even
consider. I was raised and schooled in the wood-crafting world by old-time
artisans. "Power-tools" were "horrid" pieces of machinery unworthy of
praise. I laugh now over their obstinate attitude concerning any form of
change. :lol: :lol:

For decades, I refused to use, or have on my property, any type of pneumatic
air nailer. Hand-hammered nails was the ONLY way I built anything.
I could have never been more incorrect.!!!! I was faced with a complete
remodel on this old farm-house I bought. All the way down to replacing
every piece of trim. I broke down and bought a "finish" air nailer. WOW!!!

An old dog can learn new tricks!! I was flabbergasted!! LOL

I added ONE more air-fastener: A 1/4"-Crown Air-Stapler that can shoot
small 1/4" staples from a half-inch long all the way to an Inch and a half.
Without question, it's quicker, safer, and much more stable than trying
to use conventional nails. All you need to do is use a little glue along with it.

I use old "re-purposed" 1/4" peg-board for the nest box bottoms.

With the air-nailers one can use smaller thicknesses of sheeting.
Just add glue.

Grumpy.

I love my old Senco 1/2 inch crown stapler
 
grumpy":uxdhx9q3 said:
One of the best investments I ever made, took nearly my entire life to even
consider. I was raised and schooled in the wood-crafting world by old-time
artisans. "Power-tools" were "horrid" pieces of machinery unworthy of
praise. I laugh now over their obstinate attitude concerning any form of
change. :lol: :lol:

For decades, I refused to use, or have on my property, any type of pneumatic
air nailer. Hand-hammered nails was the ONLY way I built anything.
I could have never been more incorrect.!!!! I was faced with a complete
remodel on this old farm-house I bought. All the way down to replacing
every piece of trim. I broke down and bought a "finish" air nailer. WOW!!!

An old dog can learn new tricks!! I was flabbergasted!! LOL

I added ONE more air-fastener: A 1/4"-Crown Air-Stapler that can shoot
small 1/4" staples from a half-inch long all the way to an Inch and a half.
Without question, it's quicker, safer, and much more stable than trying
to use conventional nails. All you need to do is use a little glue along with it.

I use old "re-purposed" 1/4" peg-board for the nest box bottoms.

With the air-nailers one can use smaller thicknesses of sheeting.
Just add glue.

Grumpy.

Grumpy I have had a brad-nailer for a few years, Works great for small things. I am currently building a bunch of Honey Bee hives to start raising bees for honey and bees wax. I knew my little brad-nailer was too small,So I borrowed my brothers 1/4" crown stapler. Man does that work well. After using the stapler I decided to get my own. I went to the local lumber yard (I live out in the country) he ordered me a senco 1/4" crown stapler that handles 3/8" to 1 5/8" staples. Like you said add some good wood glue and thing things don't let go. I think the owner of the lumber yard sold it to me at cost because I have been buying alot with him the last 4 or 5 years. It only cost me $105. :)
 
I thought I would add how we built our nest boxes. That being the royal "we" since DH actually built them. :D

DH bought some large white plastic cutting boards and cut out the side pieces from that. Once the sides were assembled he attached some galvanized 1/2" hardware cloth to the bottom so that the waste could fall through. Then he cut very narrow strips and attached one to each long side on the bottom, which creates "runners" like on a sled that keeps the box from catching on the cage floor if you slide it.

We actually have the Sani-Nests from Bass, which attach to the bottom of the cage. We just slide the nest box into the opening. A couple advantages - they are very sanitary, since cutting boards were meant to be cleaned, and we can write the does name on the front end of the box with a Sharpie, which can be washed off when we replace the doe. So far the insulation value of the cutting board seems to be very good!

In the colder months we cut a piece of cardboard and put it between the "runners" to add insulation to the bottom of the box. If this gets soiled it is very easy to change out.
 
Comet007":2xi4u2qt said:
I thought I would add how we built our nest boxes. That being the royal "we" since DH actually built them. :D

DH bought some large white plastic cutting boards and cut out the side pieces from that. Once the sides were assembled he attached some galvanized 1/2" hardware cloth to the bottom so that the waste could fall through. Then he cut very narrow strips and attached one to each long side on the bottom, which creates "runners" like on a sled that keeps the box from catching on the cage floor if you slide it.

We actually have the Sani-Nests from Bass, which attach to the bottom of the cage. We just slide the nest box into the opening. A couple advantages - they are very sanitary, since cutting boards were meant to be cleaned, and we can write the does name on the front end of the box with a Sharpie, which can be washed off when we replace the doe. So far the insulation value of the cutting board seems to be very good!

In the colder months we cut a piece of cardboard and put it between the "runners" to add insulation to the bottom of the box. If this gets soiled it is very easy to change out.

I also like the sani-nest [with the cardboard liner] in the floor of the cage for summers, they are great until temps drop below 10 f - after that -I like wooden or metal boxes with a couple of layers of cardboard inside them. [I usually don't breed in the winter, as the garden feed supply is short, and feeding pellets is expensive]
 
michaels4gardens":3vlhka71 said:
I also like the sani-nest [with the cardboard liner] in the floor of the cage for summers, they are great until temps drop below 10 f - after that -I like wooden or metal boxes with a couple of layers of cardboard inside them. [I usually don't breed in the winter, as the garden feed supply is short, and feeding pellets is expensive]

We live on a sheltered island in the Pacific Northwest, and our winters AND summers are milder even than the mainland just a few miles away. We only get snow a few days at a time, and never much, and our temps hang out a lot in the upper 30's to low 50's just depending. We've had a cold snap recently and it did have us a little worried for the kits born three weeks ago, but their mama's all pulled enough fur to make a nice parka. :D

This will be our first winter with rabbits, but we are planning to continue our 25 day breed back year round, of course we'll be watching to see how it goes. I had bought a case of the Sani-Nest liners, but we only used them the first time - we like having the cutting board box that slides in and out because then we can just pull it out for easy access to the kits. This works great for us because we weigh the kits almost every day for the first two weeks (gathering and monitoring our stats for herd improvement) and this way we can easily take them into the house.

One other thing that really benefits our rabbits is that we built our bunny barn with a clear roof and in the Summer it is has a lot of shade from some large maple trees, so there is no direct sun. When it was hot here this Summer, it was actually cooler in the bunny barn than anywhere else in our yard. But in the winter when the leaves drop the sun shines into the barn, which seems to keep it warmer. Our wind generally comes from the SW, and our open (hardware cloth) wall is on the North side, so it keeps the rain out as well. Other than our strangely hot weather this year (happens around every 5 years or so), this is the perfect place for keeping buns!
 
Here are plans I found online to make mine for our Holland Lops, Lionheads and Mini-rex........

NestBox.jpg
NestBox2.jpg
 
My nest boxes for my New Zealands are 12" wide x 12" high and 24" long with half the top being covered. They are made of 3/4" plywood with 1x2 floor wire on the bottom to allow any liquids to run out. I've had most of them for six years and they are pretty chewed up but still usable. I don't think the thickness of the walls of the nestbox is that important as the doe will build whatever nest is necessary for the current weather conditions. The exit at the end of the nest box is 5" high and I've built a little step on the outside in case a wee one gets outside and needs to get back in. I like the plywood because it gives the rabbits something to chew on and I can whip another one up in a few minutes if one needs replacing, then just throw the old one in the fire pit in the back yard.
 
Adding to the above also design the house in a way that fresh air can get in when its very hot, you don't want your rabbit to die from too much heat. The rabbit house can have two rooms, one room can be open with windows whilst the other room can be closed to give the rabbit more privacy.
 
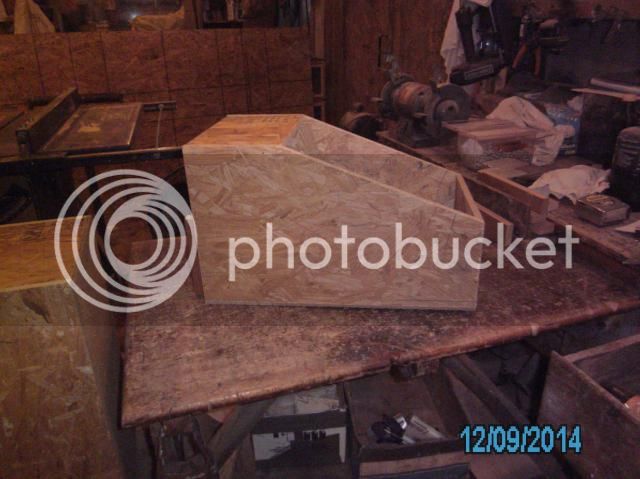
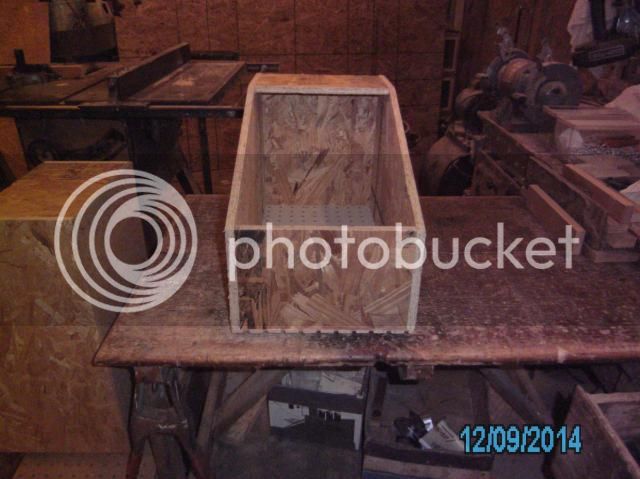
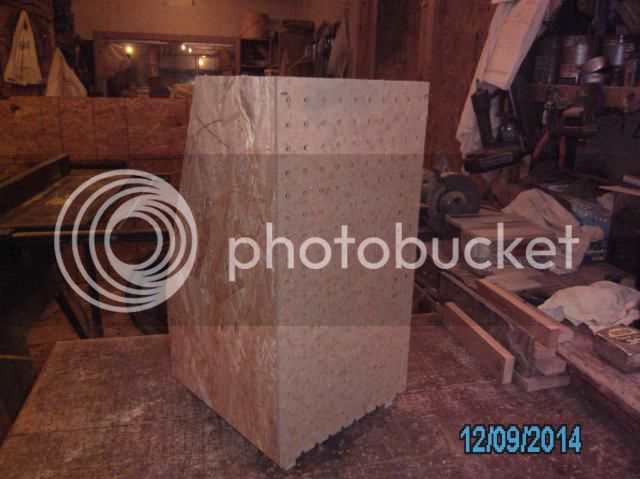
Here's a few pics of the style I've used for years for my meat rabbits.
If you "squint" real hard, you can see the small nails driven into the bottom
with the heads cut off. If you do this, a nosy-doe WON'T move that box.
It'll stay where you put it. Guaranteed.
BTW: All of the lumber was scraps picked up off of different job-sites.

newnestboxes002_zpsc2112b60.jpg


newnestboxes001_zps3b762c3d.jpg


newnestboxes003_zps4caed1a8.jpg
 
3girls&1man":uro7bzna said:
I need all the help I can get on building nest boxes. I have holland Lops and NZ. I currently use plastic litter pans but let me tell you they do not work. They are so lite that they flip them over and when the doe jumps out there it goes on the side. I even tried zip tying it to the cage and it just dont work out. SO any advise on building the nest boxes would help or any ideas for nest box in general. I do have an outdoor rabbitry. Thanks in advance

If you happen to like the boxes you have and simply want them to remain stable and unmoved, drill 2 holes in the bottom of them and run a screw through the hole into a piece of scrap wood under the bottom of the cage. So, the screw goes through the box, through the bottom of the cage, and into the scrap wood. They'll stop moving. When it's time to remove the box, back out the screws and the cage is back to normal. <br /><br /> -- Tue Dec 30, 2014 9:43 pm -- <br /><br />
grumpy":uro7bzna said:
One of the best investments I ever made, took nearly my entire life to even
consider. I was raised and schooled in the wood-crafting world by old-time
artisans. "Power-tools" were "horrid" pieces of machinery unworthy of
praise. I laugh now over their obstinate attitude concerning any form of
change. :lol: :lol:

For decades, I refused to use, or have on my property, any type of pneumatic
air nailer. Hand-hammered nails was the ONLY way I built anything.
I could have never been more incorrect.!!!! I was faced with a complete
remodel on this old farm-house I bought. All the way down to replacing
every piece of trim. I broke down and bought a "finish" air nailer. WOW!!!

An old dog can learn new tricks!! I was flabbergasted!! LOL

I added ONE more air-fastener: A 1/4"-Crown Air-Stapler that can shoot
small 1/4" staples from a half-inch long all the way to an Inch and a half.
Without question, it's quicker, safer, and much more stable than trying
to use conventional nails. All you need to do is use a little glue along with it.

I use old "re-purposed" 1/4" peg-board for the nest box bottoms.

With the air-nailers one can use smaller thicknesses of sheeting.
Just add glue.

Grumpy.

I am a woodworker by trade. I wouldn't consider using hand nails. I have or have access to several different size nail and staple guns. I even have one that shoots a 23 gauge brad which leaves a hole so small you really don't need to fill it. The hole is very similar in size to a wood pore, so it blends right in. It's great for securing fine trim pieces. I can shoot through a 1/4" x 1/4" piece without splitting it.
 

Latest posts

Back
Top